Did you know that Uber passengers can enter multiple destinations into the Uber app? I made a quick instructional video that shows you how. This video is for both passengers and Uber drivers. Most passengers don’t know how to do this, so it’s a really great tip that only takes a minute to explain.
Editor’s note: We originally posted this article in December 2015, and since then Uber has made a lot of changes to the way that passengers and drivers add multiple destinations to a trip. We’ve updated both the video and the content in this article to give you the most up-to-date advice.
Check out the video to see how to add multiple stops to your Uber trip. then the video transcript below to see detail screen shots of the process. If you’re a driver, I strongly recommend that you enroll in Maximum Ridesharing Profits, my online course for drivers that will teach you how to earn more and spend less.
Get advanced tactics and earn more! Maximum Ridesharing Profits has my top tips for earning more money. Click here to enroll.
Here’s the situation that often happens to drivers and passengers. It happens very frequently when you’re taking people out to the bars or dinner, or when you’re taking them home. I notice it happens a lot around 2:00 or 3:00 a.m. when people are going home and they live at different destinations. Let’s say you’re a group of four people, two couples. Two of you live in one place, and two of you live in another. How should you handle two destinations in the app?
How to handle multiple destinations in the Uber app
Uber passengers have the ability to add up to three stops directly in the Uber app. As a driver, I’ve always made stops for my passengers in the past, but this now makes it a little more official and seamless by having those stops directly in the app. And the stops do need to be pretty quick out of courtesy for your driver’s time. Uber suggests that additional stops be no more than three minutes long.
So let’s jump into the app. We’ll show you how to add stops, and we’ll also show you the in-app experience, what it looks like when you take a ride and make those stops. In the video I have both the driver app and the passenger app displayed. so you can see what it looks like from the driver’s perspective as well.
How to add multiple stops to your Uber trip
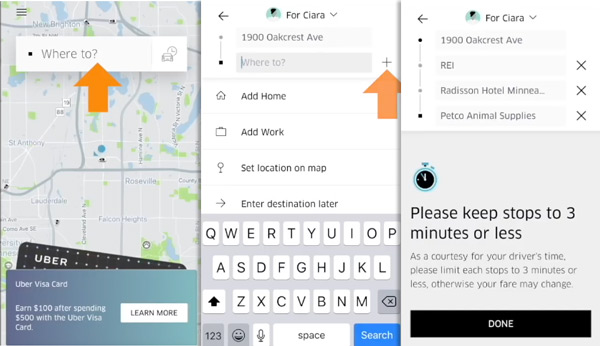
The first thing you’ll do is select the “Where To” area. Then you’ll see this plus sign (+) on the right side of the text box where you enter destinations. Select the plus sign (+) to add an extra stop. You’ll see the disclaimer, “Please keep stops to three minutes or less as a courtesy for your driver’s time.”
Add the first stop, then tap the plus sign (+) to add the second stop. And then you can add a third stop, which is essentially your final destination. Select Done. And then you’ll confirm. Confirm your pick up location. And when you get in the car it’s always nice to let the driver know, “Hey, I’m going to be making a few stops here.”
Here’s the step-by-step to adding multiple stops to your trip:
- Tap “Where To”
- Tap the plus sign (+) to enter another stop
- Tap the plus sign again to enter additional stops
- When you’re done adding stops, tap “Confirm pickup location”
The app will let the driver know about your multiple stops as well, but as a driver it’s nice to get that verbal confirmation from the passenger, and as a passenger it will be good to get verbal confirmation from your driver that you correctly entered your stops.
So the trip has begun. The driver will navigate to the first stop. Then, when you arrive at the first stop, you’ll see that first stop will gray out on the list. Then your driver will navigate to the next stop. When you arrive there, you’ll then see that that stop will gray out from the list.
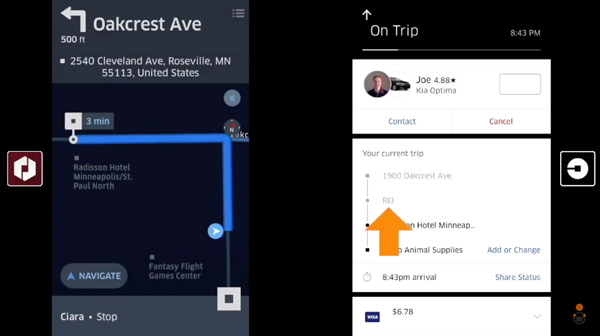
Your driver will then navigate to your final destination. And once you reach your final destination, the trip will end, and you’ll be able to rate your driver and add a tip.
Adding multiple stops in the past wasn’t easy to do, so this feature makes multiple stops more official and a lot easier. It makes it easier for the driver. Again, I would suggest that when you are making stops, just say to the driver, “I’m going to make a couple stops.” Even though the app will tell them, it’s always nice for the driver to have that information directly from you.
You can update your destination in the Uber app at any time
If you’re a passenger, you can actually update your destination or add an addition stop at any point. To do that, tap on the driver’s information at the bottom of the screen. Under the “Your Current Trip” section, tap “Add or Change” next to your current destination to change your destination or to add a stop. The price of your trip may change if you add more stops or change your destination.
Some notes about the Next Trip feature for drivers
When drivers are about to reach the final destination of a trip, they may receive a new ride request for their next ride. If they accept that next trip, passengers won’t be able to update their destination or add a stop, so make sure to add additional stops before the trip begins, or near the beginning of the trip.
If you’re a driver and you receive a Next Trip request when a passenger needs to change their destination, don’t accept the Next Trip request. Your acceptance rating will drop, but you can’t be deactivated for that. If your passenger asks to add additional stops but didn’t do it in the app, let them know that they can do it inside the app when they’re setting up the trip.
More helpful tips for Uber passengers and drivers
How to add multiple stops to an Uber trip is one of the top questions that passengers and drivers have about the Uber app, so hopefully this video and article helped you figure this issue out.
We also have other helpful tips for passengers and drivers.
- What’s the maximum distance you can take on an Uber Lyft trip?
- Why can’t drivers see the passenger’s destination when they accept a trip?
- Can someone else ride with me while I drive for Uber?
If you have any other questions, feel free to reach out, leave a comment, or email me. Take care!
Ready to Maximize Your Ridesharing Profits?

Maximum Ridesharing Profits is The Rideshare Guy's online video course. Enroll to learn how rideshare veterans earn more, spend less, and treat rideshare driving like a real business.